- Welcome to Westlake Publishing Forums.

News:
REGARDING MEMBERSHIP ON THIS FORUM: Due to spam, our server has disabled the forum software to gain membership. The only way to become a new member is for you to send me a private e-mail with your preferred screen name (we prefer you use your real name, or some variant there-of), and email adress you would like to have associated with the account. -- Send the information to: Russ at finescalerr@msn.com
Recent posts
#71
Modellers At Work / Re: Luke's Garage & Gas Statio...
Last post by Stuart - March 20, 2025, 10:11:40 AMI have begun to scout around for details to add in and around the garage. Most of what I show here are prints of 3D files I have been able to find from various sources on the internet.

The tires and wheel rims are painted, and finished. The tools laying on the floor, the stool, bench vise, tool box and radio (barely visible behind the stairs) have yet to be painted and aged. As time goes on, I will continue to add additional clutter, auto parts, and tools to the scene. The copper fire extinguisher on the shelf unit is my own 3D creation and still needs additional work for completion.

To the side of the garage are cast off auto parts and mechanical junk, also still awaiting paint and aging (all 3D prints). The 16 gallon metal oil drum is my own creation using .005" copper sheet. I pressed the ribs into the flat sheet of copper and then rolled and soldered the "tube" together, added a bottom to the drum with the same copper sheet material and completed the build by soldering .032" brass wire to the bottom and top rims. The soft copper made it easy to add a few dents and dings into the side of the barrel.
Stuart
The tires and wheel rims are painted, and finished. The tools laying on the floor, the stool, bench vise, tool box and radio (barely visible behind the stairs) have yet to be painted and aged. As time goes on, I will continue to add additional clutter, auto parts, and tools to the scene. The copper fire extinguisher on the shelf unit is my own 3D creation and still needs additional work for completion.
To the side of the garage are cast off auto parts and mechanical junk, also still awaiting paint and aging (all 3D prints). The 16 gallon metal oil drum is my own creation using .005" copper sheet. I pressed the ribs into the flat sheet of copper and then rolled and soldered the "tube" together, added a bottom to the drum with the same copper sheet material and completed the build by soldering .032" brass wire to the bottom and top rims. The soft copper made it easy to add a few dents and dings into the side of the barrel.
Stuart
#72
Modellers At Work / Re: Feldbahnmodule with ship
Last post by Ray Dunakin - March 19, 2025, 10:38:17 PMI think you could probably teach the builders of the real bridge a thing or two!
#73
Military Modeling / Re: Back to the roots
Last post by Ray Dunakin - March 19, 2025, 10:31:51 PMCool project, and a great start!
#74
Modellers At Work / Re: Feldbahnmodule with ship
Last post by Bernhard - March 19, 2025, 01:10:25 PMPerfect details. Are the long parts also sandblasted? If so, how do you do that?
Bernhard
Bernhard
#75
Modellers At Work / Re: Feldbahnmodule with ship
Last post by Lawrence@NZFinescale - March 18, 2025, 10:06:14 PMWe should form a support group...
#76
Modellers At Work / Re: Feldbahnmodule with ship
Last post by finescalerr - March 18, 2025, 12:19:57 PMCompared to this, my models are crude toys. -- Russ
#77
Modellers At Work / Re: Feldbahnmodule with ship
Last post by fspg2 - March 18, 2025, 06:57:27 AMThe next steps will follow, so there are a few small parts again today.
In some places, I won't be able to use the finishing cutter to round off the second side of the rivet head when it is installed.
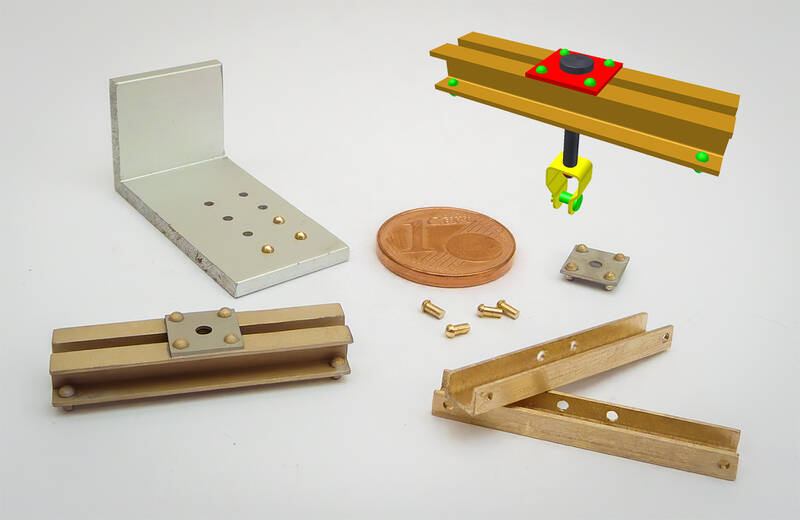
In contrast to the wire pins normally used as rivet replacements, I have fitted some angles and U-profiles with 1.0mm rivets (head diameter 1.3mm - shank 1.0mm). I accepted the different diameters of the head and the opposite side. On the one hand, the corners are hardly visible later and on the other hand, the slightly larger head diameter provides a little more security against falling out when soldering the neighboring parts when assembling the many individual pieces.
Small Pertinax gauges were again used for the vertical and parallel alignment.
Träger-Montage 112 (fspg2)
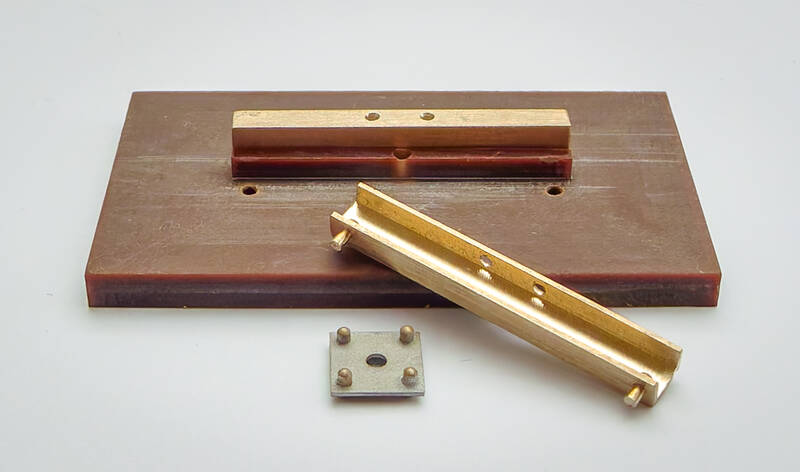
Four of these rivets were soldered into the 6.5mm x 6.5mm nickel silver sheet. My existing rivets were a little too long at 6.0mm, so I had to shorten them first.
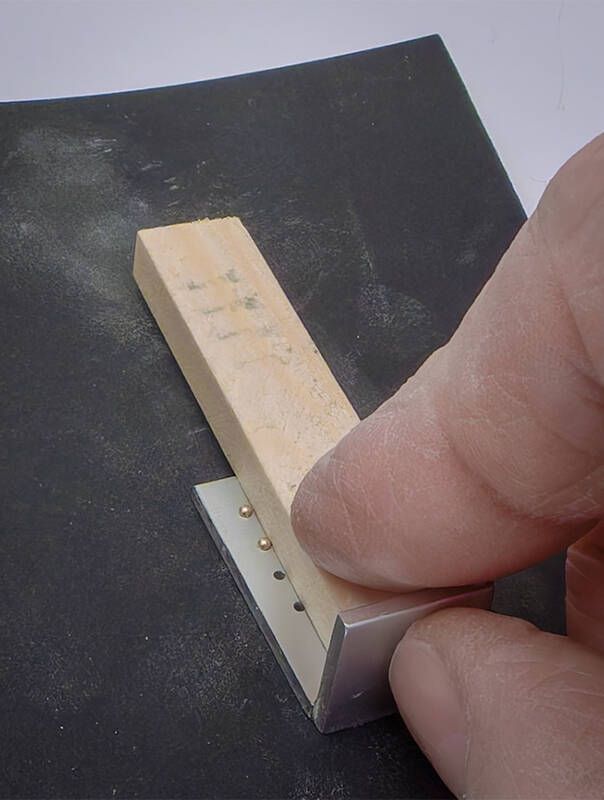
I used a 2.0mm thick aluminum angle from the leftover box. The excessively long rivets were inserted into eight 1.0mm holes drilled and shortened on the underside with a side cutter. I then sanded the whole unit smooth on a 400 grit sandpaper, holding the small rivet heads in place with a piece of wood (in the following picture, the piece of wood is pushed to one side to show the rivet heads).
Träger-Montage 117 (fspg2)
I then wound the small nickel silver plate with the four shortened rivets...
Twincut Gebr. Ott (fspg2)
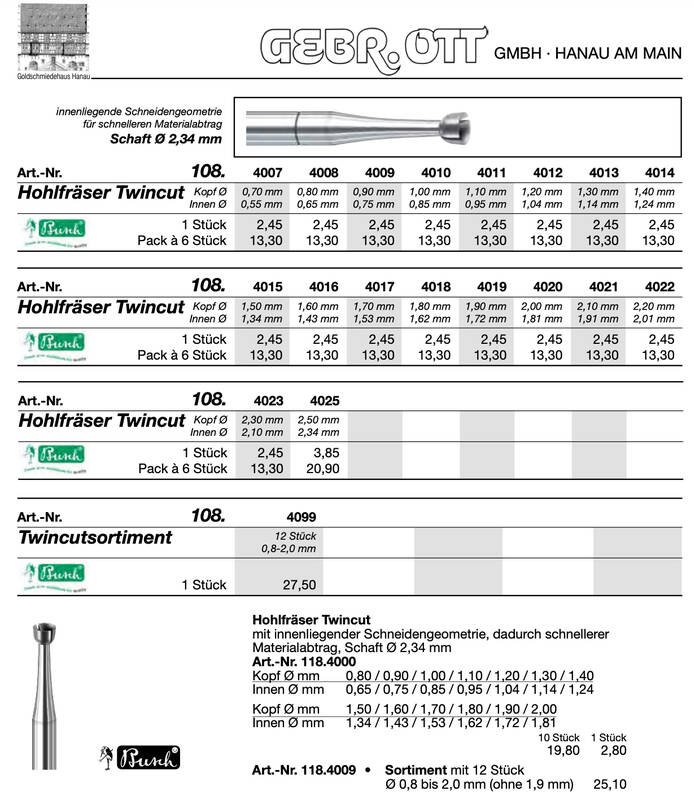
(Excerpt from the catalog: https://www.gebr-ott-gmbh.com/werkzeuge-maschinen/)
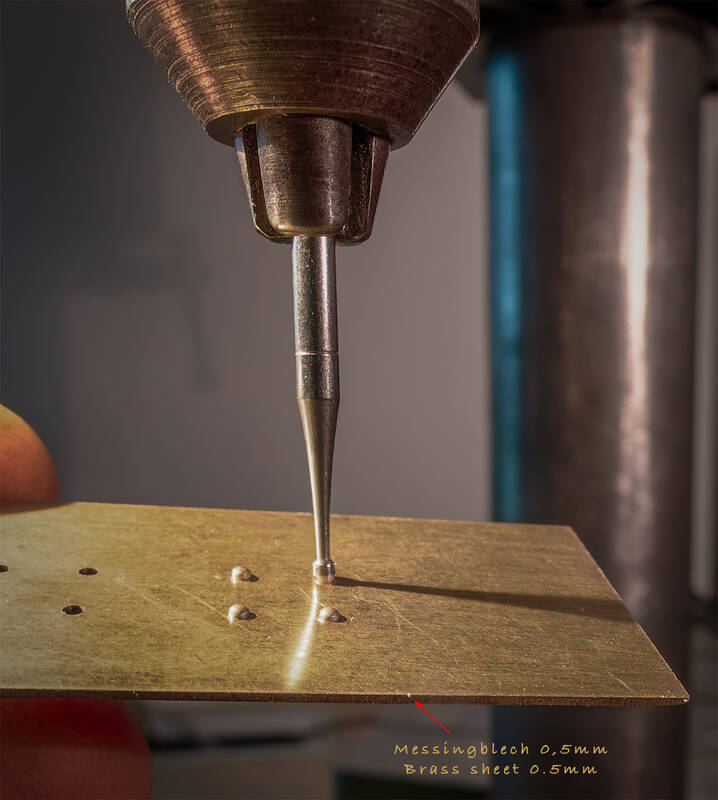
...a 0.5mm brass sheet with corresponding holes served as a spacer when working with the finishing burr.
Träger-Montage 111 (fspg2)
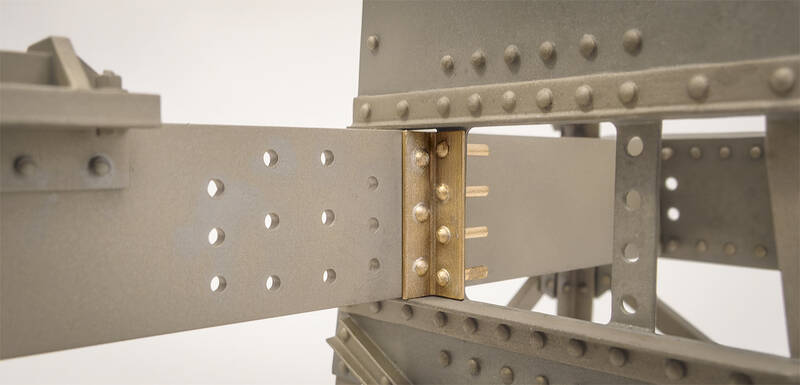
The first of two parts is ready to fit.
Träger-Montage 113 (fspg2)
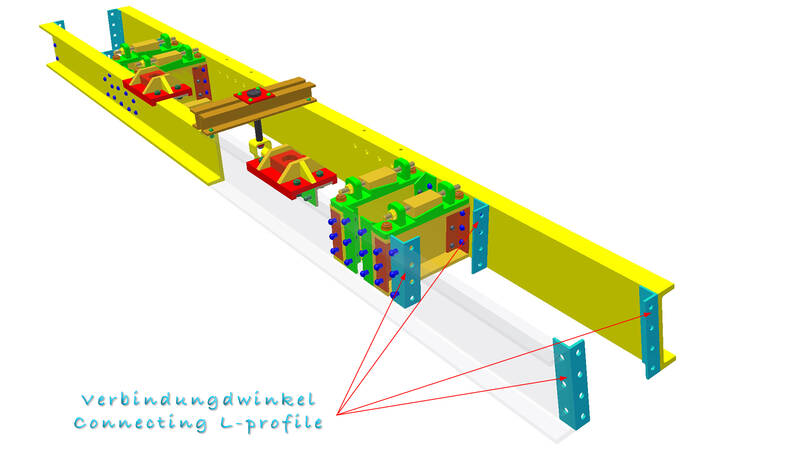
The two support beams are connected to the two lateral portal beam tower sides with the aid of eight straight and eight beveled small L-profiles.
Träger-Montage 118 (fspg2)
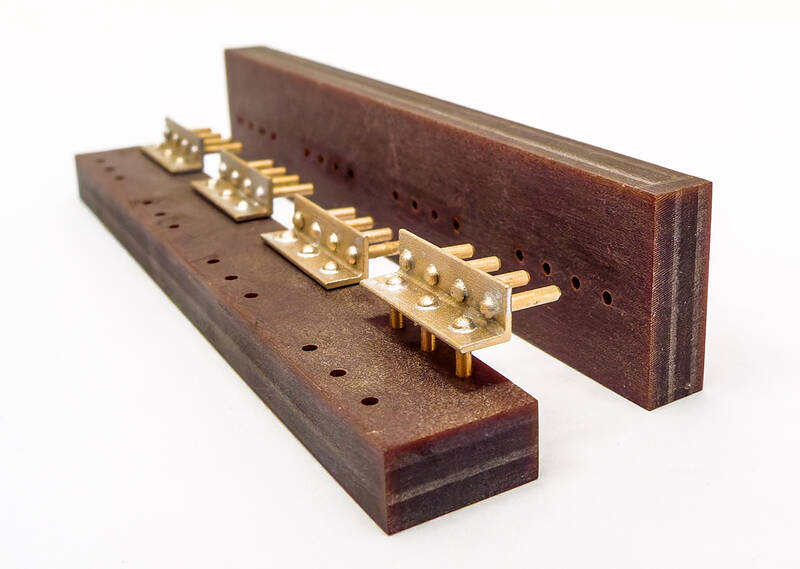
These were also fitted with the 1.0 mm rivets and soldered in two corresponding Pertinax gauges.
Träger-Montage 114 (fspg2)
Träger-Montage 115 (fspg2)
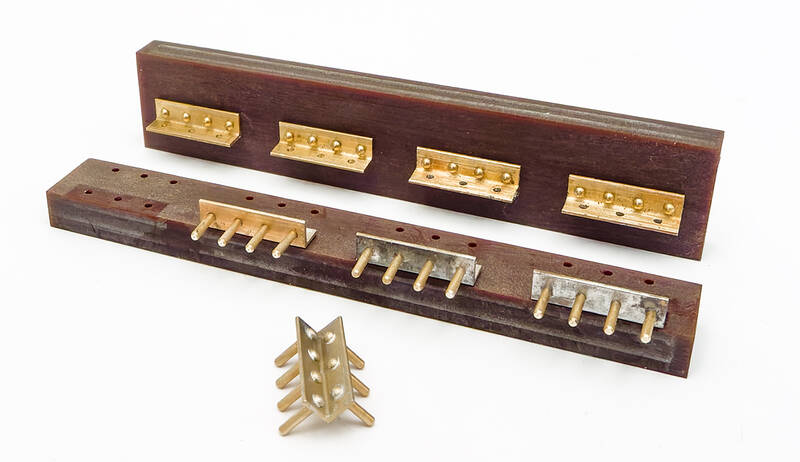
The rivets of the L-profile still need to be shortened and rounded off.
Träger-Montage 116 (fspg2)
In some places, I won't be able to use the finishing cutter to round off the second side of the rivet head when it is installed.
In contrast to the wire pins normally used as rivet replacements, I have fitted some angles and U-profiles with 1.0mm rivets (head diameter 1.3mm - shank 1.0mm). I accepted the different diameters of the head and the opposite side. On the one hand, the corners are hardly visible later and on the other hand, the slightly larger head diameter provides a little more security against falling out when soldering the neighboring parts when assembling the many individual pieces.
Small Pertinax gauges were again used for the vertical and parallel alignment.
Träger-Montage 112 (fspg2)
Four of these rivets were soldered into the 6.5mm x 6.5mm nickel silver sheet. My existing rivets were a little too long at 6.0mm, so I had to shorten them first.
I used a 2.0mm thick aluminum angle from the leftover box. The excessively long rivets were inserted into eight 1.0mm holes drilled and shortened on the underside with a side cutter. I then sanded the whole unit smooth on a 400 grit sandpaper, holding the small rivet heads in place with a piece of wood (in the following picture, the piece of wood is pushed to one side to show the rivet heads).
Träger-Montage 117 (fspg2)
I then wound the small nickel silver plate with the four shortened rivets...
Twincut Gebr. Ott (fspg2)
(Excerpt from the catalog: https://www.gebr-ott-gmbh.com/werkzeuge-maschinen/)
...a 0.5mm brass sheet with corresponding holes served as a spacer when working with the finishing burr.
Träger-Montage 111 (fspg2)
The first of two parts is ready to fit.
Träger-Montage 113 (fspg2)
The two support beams are connected to the two lateral portal beam tower sides with the aid of eight straight and eight beveled small L-profiles.
Träger-Montage 118 (fspg2)
These were also fitted with the 1.0 mm rivets and soldered in two corresponding Pertinax gauges.
Träger-Montage 114 (fspg2)
Träger-Montage 115 (fspg2)
The rivets of the L-profile still need to be shortened and rounded off.
Träger-Montage 116 (fspg2)
#78
Military Modeling / Re: Back to the roots
Last post by Bernhard - March 18, 2025, 02:23:55 AMAh yes, of course I know the village. A typical scene from a Swiss army refresher course. I've experienced it a few times in a similar form.
Bernhard
Bernhard
#79
Military Modeling / Re: Back to the roots
Last post by Peter_T1958 - March 18, 2025, 01:41:59 AMThanks, Russ and Bernhard!
I have several kits of that tank in 1/35 scale, and it would have been much easier to build one of them. But I wanted it in 1/25 scale, Why? I don't know - maybe because it's just bigger!
@Berhard: Schönholzerswilen. And that photo with the elderly woman isn't a coincidence. The idea to present the model one day with that lady in front of it, that thought has hounted me all the time. Would be a great contrast. But then I should find at least a similar 3D figure...
We will see!
#80
Painting & Weathering Techniques / Re: Thinning Vallejo Paints
Last post by Lawrence@NZFinescale - March 17, 2025, 11:48:48 PMThin to suit.
Glycerine is pretty easy to get. I think I got a small bottle from the supermarket, although I have around half of a 5 litre bottle I'd give away if you collected. One of the 3Dprint resins I used to use needed to be cured under glycerine.
Lawrence
Glycerine is pretty easy to get. I think I got a small bottle from the supermarket, although I have around half of a 5 litre bottle I'd give away if you collected. One of the 3Dprint resins I used to use needed to be cured under glycerine.
Lawrence